4.2. Zone Settings
The Model 346 allows you to establish up to ten custom contiguous temperature zones where the controller will update PID, heater range, manual output, output limit, ramp rate, and control input settings to pre-programmed values, upon transitioning into the zone. Zone control can be active for multiple control loops at the same time. Configure the zones using 1 as the lowest to 10 as the highest zone. Zone boundaries are always specified in kelvin (K). The bottom of the first zone is always 0 K; therefore, only the upper limit is required for all subsequent zones.
To use the programmed zones, set the output mode to Zone. In Zone mode, the instrument updates the control settings each time the setpoint crosses into a new zone. If you change the settings manually, the controller uses the new setting while it is in the same zone, and updates to the programmed zone table settings when the setpoint crosses into a new zone.
The zone settings include a Control Input parameter for each temperature zone. This allows a different feedback sensor to be used for each temperature zone. For example, a diode sensor can be used while cooling down from room temperature to 10 K, at which point the Control Input could be switched to a Cernox™ sensor for temperatures under 10 K.
Note
Zone parameters can only be configured over the remote interface. Therefore, it is highly recommended to use ColdSync™ to configure zones for a given output.
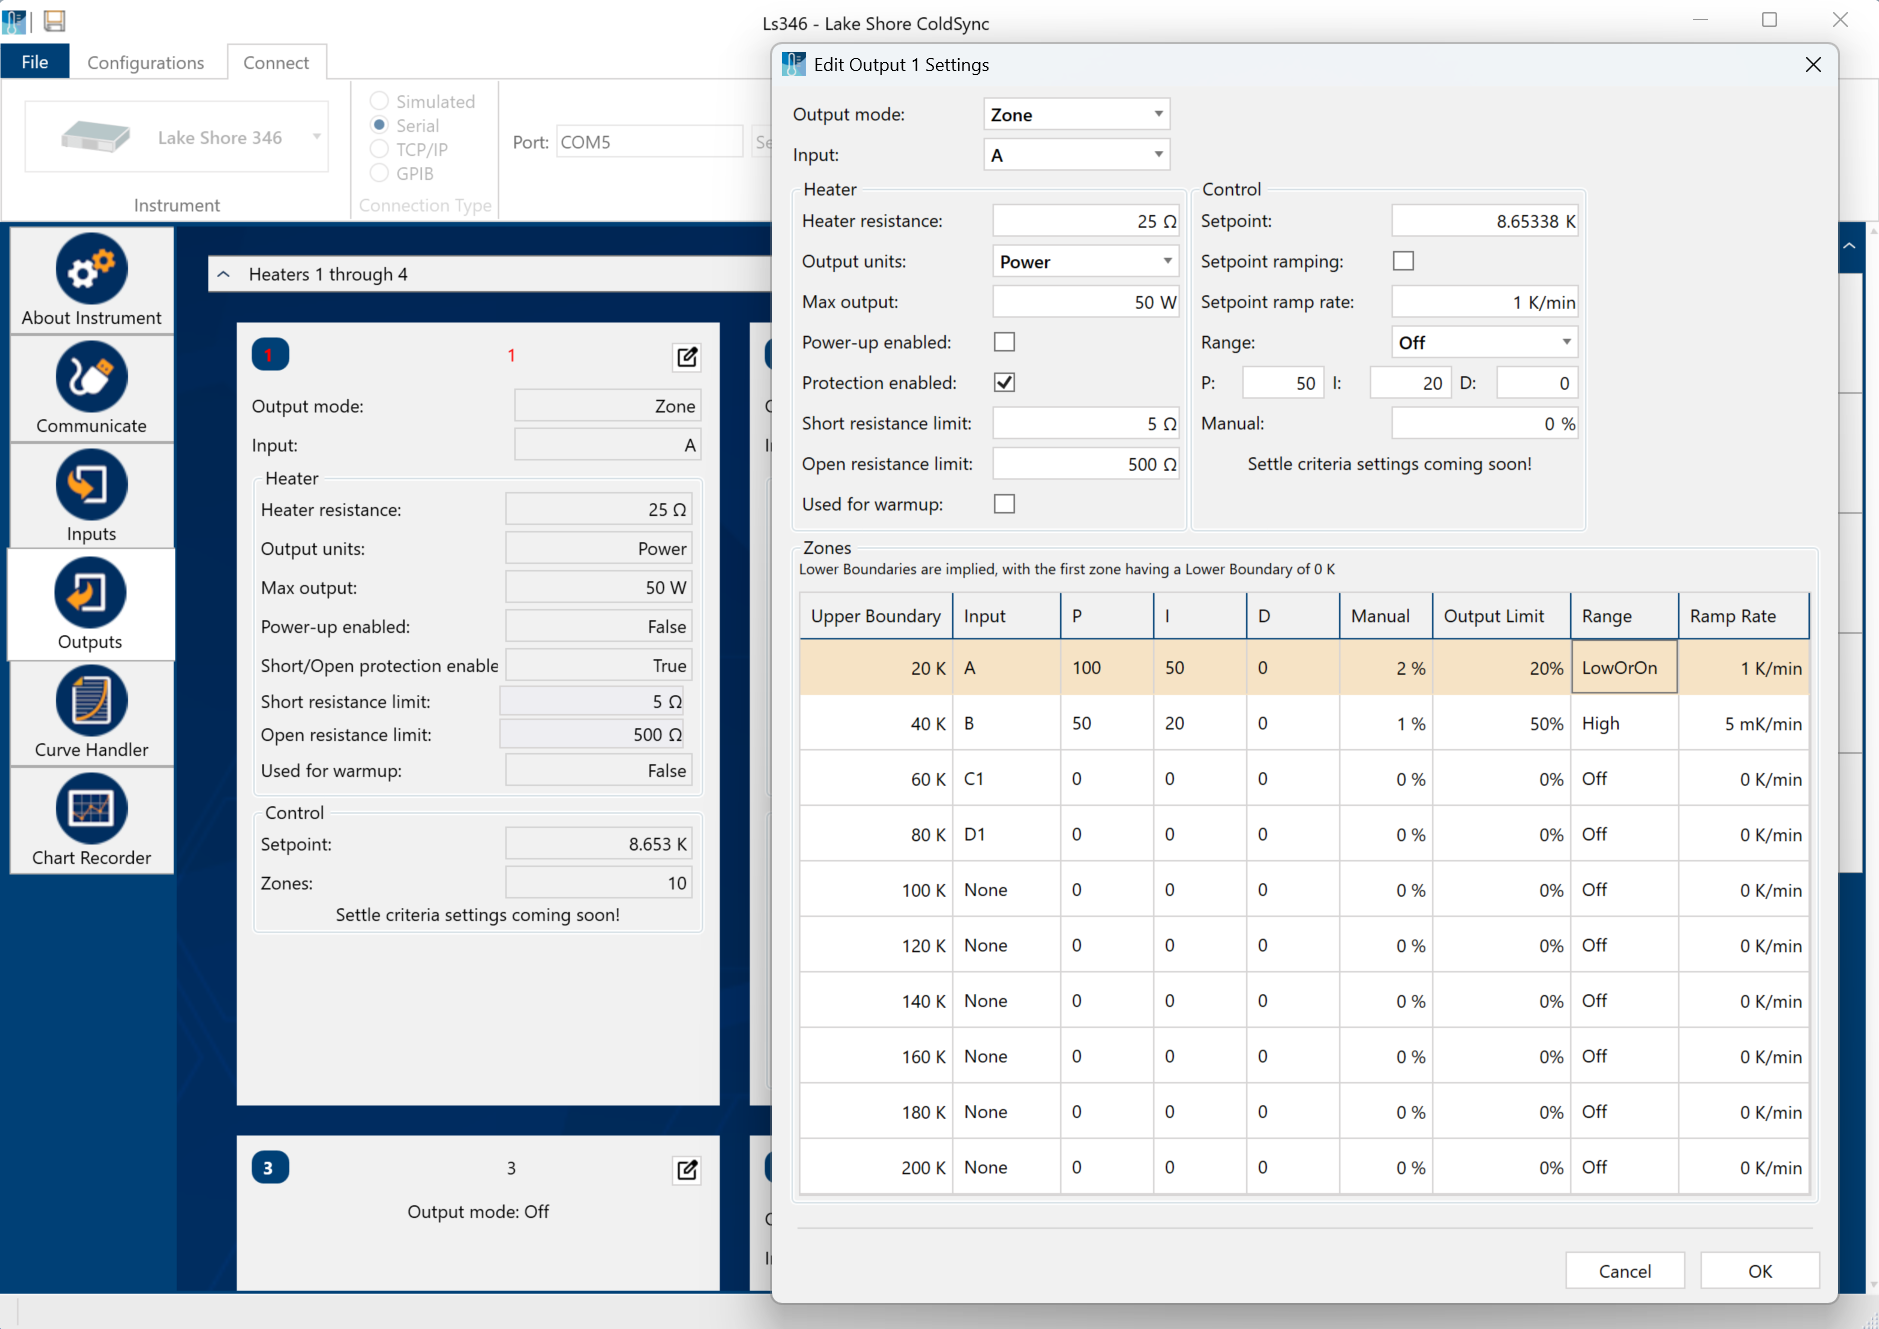
Figure 4.2 ColdSync™ zone setup screen
To illustrate how the control parameters are updated in Zone mode, consider the zone settings from the table below. Starting from room temperature (about 300 K) and setting a setpoint of 2 K (with Setpoint Ramping turned on), the setpoint will begin ramping at the current setpoint Ramp Rate. Once the setpoint crosses 100 K, the control parameters from Zone 8 will be used. The setpoint ramp will then continue toward 2 K at a rate of 20 K/min until crossing 50 K, at which point the control parameters from Zone 7 are loaded. This pattern will continue until the final setpoint value of 2 K is reached, or another setpoint is entered. Note that Input B will be used in all zones greater than 10 K (Zones 4 to 8), and Input A will be used in all zones below 10 K (Zones 1 to 3).
Zone |
Lower boundary (implicit) |
Upper boundary |
P |
I |
D |
Manual output |
Output limit |
Range |
Ramp rate |
Control input |
|---|---|---|---|---|---|---|---|---|---|---|
10 |
n/a |
0 K |
50 |
20 |
0 |
0.0% |
100% |
Off |
0.1 K/Min |
Default |
9 |
n/a |
0 K |
50 |
20 |
0 |
0.0% |
100% |
Off |
0.1 K/Min |
Default |
8 |
100.001 K |
500 K |
200 |
20 |
0 |
0.0% |
100% |
High |
30 K/Min |
Input B |
7 |
50.001 K |
100 K |
185 |
25 |
0 |
0.0% |
100% |
High |
20 K/Min |
Input B |
6 |
25.001 K |
50 K |
150 |
30 |
0 |
0.0% |
100% |
High |
10 K/Min |
Input B |
5 |
15.001 K |
25 K |
100 |
30 |
0 |
0.0% |
100% |
High |
5 K/Min |
Input B |
4 |
10.001 K |
15 K |
85 |
35 |
0 |
0.0% |
100% |
High |
2 K/Min |
Input B |
3 |
7.001K |
10 K |
85 |
35 |
0 |
0.0% |
100% |
High |
0.9 K/Min |
Input A |
2 |
4.001 K |
7 K |
70.0 |
40.0 |
0 |
0.0% |
80% |
Low |
0.7 K/Min |
Input A |
1 |
0 K |
4 K |
50.0 |
50.0 |
0 |
0.0% |
50% |
Low |
0.5 K/Min |
Input A |
Note
Sensor accuracy and placement affects how smoothly the transition from one feedback sensor to another is performed. A large difference between the temperature readings of each sensor at the time of transition could cause a temporary instability in the temperature control due to the sudden large error introduced into the control equation
Note
It is highly recommended to use the Setpoint Ramping feature when using the Control Input zone parameter to change sensor inputs. Otherwise, a setpoint change may cause a control input sensor to operate outside of its usable range, which can result in an overload condition that shuts down the control loop.
Zones with heater autoranging
The Model 346 enables the heater autorange feature to be used in conjunction with zones. Even with heater autorange enabled, the ZONE remote interface command still requires a range parameter of LOW or HIGH to be specified when the user wants the heater to be on in a given zone. If the range is not OFF and autorange is enabled, the specified range will be disregarded, and the Model 346 will use the range selection algorithm as described in the Output and Control Setup - Control Parameters section of the Operation chapter.
Default: OnInterface Command: HTRAUTO
Note
A range of OFF can still be set to turn the heater off in situations where control is not desired, such as at room temperature, or base temperature.
Note
If autorange is enabled, the output limit can be considered a tool to limit output power or current, rather than simply output percentage as a function of range. If autorange is disabled, the specified range will be used in a given zone, and the output percentage will not exceed the limit for that zone.