4.3. Heater Groups
In some situations, it is helpful to treat two or more physical heaters as if they were a single virtual heater.
Example scenarios include:
Requiring more than 100 W of heating power into a single location
Distributing heating power around a large area using multiple discrete heaters
Heater groups 9 and 10 were created for this purpose. These Heater groups allow the user to create a single control loop, pairing one input temperature sensor, with up to 4 physical heaters. The setup of the Heater group is done in the same way outputs 1 to 4 are setup. There is an additional step required in order to tell the Model 346 which physical heaters to associate with a given Heater group.
Note
Heater groups are not intended to allow multiple heater outputs to be wired together to drive a single heater load. The feature is intended to allow for unified control of multiple discrete heater loads.
Note
A physical heater can only be associated with one Heater group at a time.
Creating a Heater group
Before pairing Heater outputs with a group, it is recommended to ensure the Heater resistance and Max output settings are configured properly for the respective physical heaters. This is because the power output of each heater in the group will be adjusted proportionally based on their individual Max output and Heater resistance settings.
To configure a Heater group, begin by navigating to the output details page of either Heater group 9 or 10.
The following shows the Heater group configuration page:
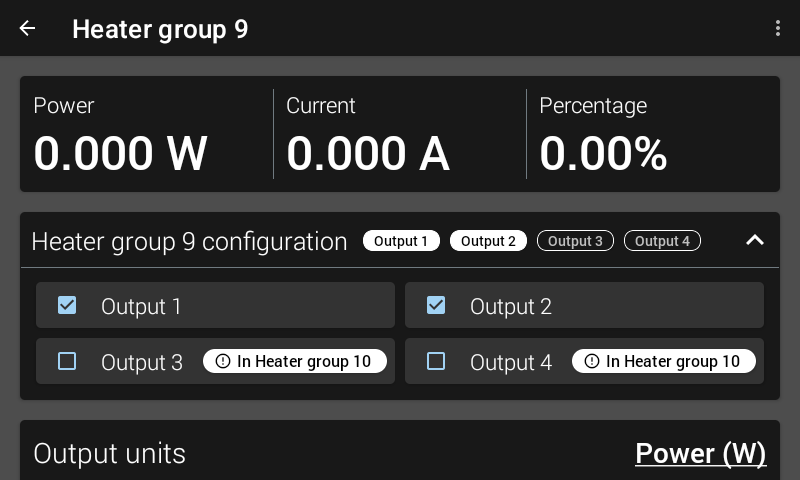
Figure 4.3 Heater group configuration screen
To add a physical output to the group, tap the name of the output listed under the Heater group configuration section. In the example above, Output 1 and Output 2 are paired with Heater group 9. A visual indication shows that Output 3 and Output 4 are paired with Heater group 10. If you decide to pair Output 3 with Heater group 9, this can be done, but only after acknowledging the prompt that appears to confirm you want to move Output 3 from Heater group 10 to Heater group 9.
Default: NoneInterface Command: OUTGROUP
Note
If any individual heater in a group has a fault condition (short/open), the entire group will be disabled to ensure safety. The group will remain disabled until the fault condition is cleared and the heaters are manually re-enabled.
Using a Heater group
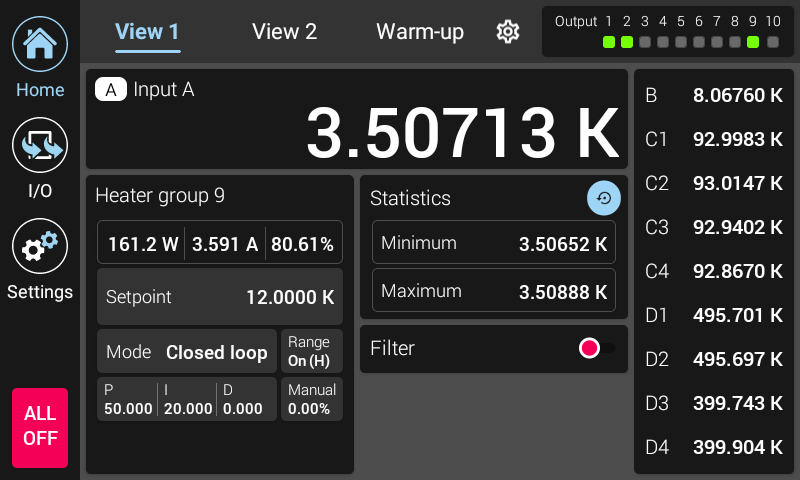
Figure 4.4 Heater group home screen
Once the Heater group is configured, it can be used in the same way as any other heater output by assigning PID, Manual out, Range and Setpoint settings. The figure above shows an example of a Heater group being assigned to a view in the Home screen and controlling in Closed loop. The Heater group shows the total output power being applied to all Heater outputs.